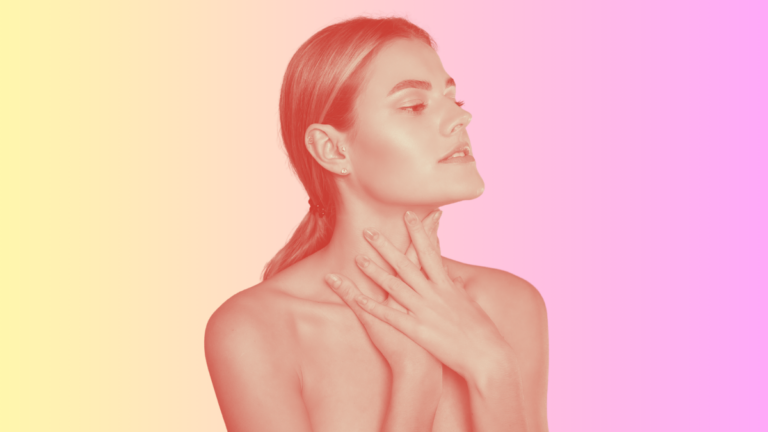
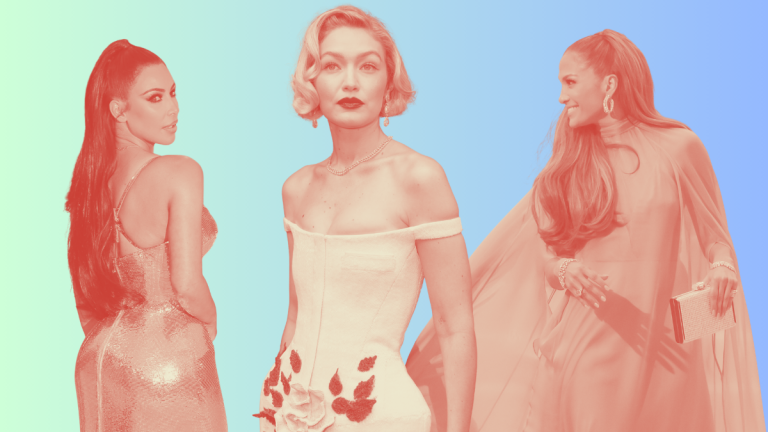
How to Lift Your Face With Makeup, No Needles Required
Lifting is not really in your vocabulary in your 20s and even early 30s. It’s not until you start to spy those first wrinkles or marionette lines or the beginning, middle, or end of jowls that you start thinking about ways to lift your face. If you’re like me, you’ll experiment in the mirror by pursing your lips out and lifting up your temples or the skin near your ears, and for those of us that haven’t dipped our toes into Botox or other injectables (or thought about facelifts yet), we start thinking more about ways we can naturally get that lift…any lift! Makeup is still one of the quickest ways, though it washes off at night, to get that lift relatively cheaply and look fantastic.
Some links are affiliate, so we may earn a small commission at no cost to you. Our policy
There’s actually a science behind it, too! Vision researchers have found that the contrast between your features and the skin around them, your eyes against your lids, your lips against the surrounding skin, fades as the years go on. When they took the same face and turned that contrast back up, people guessed they were younger (for those into studies, it’s the Aurélie Porcheron and Richard Russell, PLoS ONE, 2013, with a follow-up in Frontiers in Psychology in 2017). Makeup is just putting that contrast back, and pulling the light up toward the top of your face instead of down.
None of this is about looking 25 again. The skin you have now takes light and color beautifully once you know where to aim them. I mean, I won’t leave the house without cream blush, so I’m already sold on that!
It comes down to contrast and where the light falls
It all comes down to one idea that painters have known for centuries: light areas come forward, dark areas fall back. It’s why a cheekbone with a little glow on top of it looks higher than the same cheekbone left flat, and why a soft shadow tucked underneath reads as a hollow. Makeup artists are doing subtle chiaroscuro on a face. Put the light up high, let the shadow sit low, and the eye reads the whole face as tipped slightly upward.
Contrast is the other half of it. The Porcheron and Russell work measured something most of us feel but can’t name: a younger face has more punch between the features and the skin, and that punch softens over time. So the two moves that run through everything here are restoring that punch (a defined lash line, a brow with edges, a lip with a clear border) and aiming the brightness up. Direction matters more than coverage, and a lighter hand almost always wins. Dominique Sachse, who makes makeup tutorials for women over 50, puts it plainly: “As I get older, less is more. I find myself wearing less makeup. I think I look better with less makeup.”
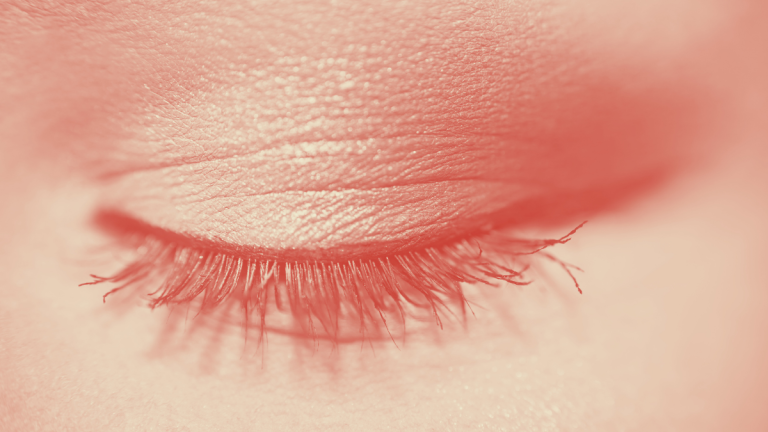
Keep the lid light, and build everything up and out
I’m not a big eyeliner person. It scares me, just because I don’t think I know how to do it, even though TBH I would love to have a Taylor Swift cat eye. What I do for my eyes is curl my eyelashes, which makes a big difference, and add a little mascara. I have hooded eyes, so I’m not really big into eyeshadow either. But taking a brightening pen and putting a little bit in the corner of my eyes, along with a little concealer in the corner, helped. And I’ve noticed that the older I get, the more concealer I wear, even though I tend to have under-eye circles. So now I’m just all about, can I diffuse the shadow a little bit?
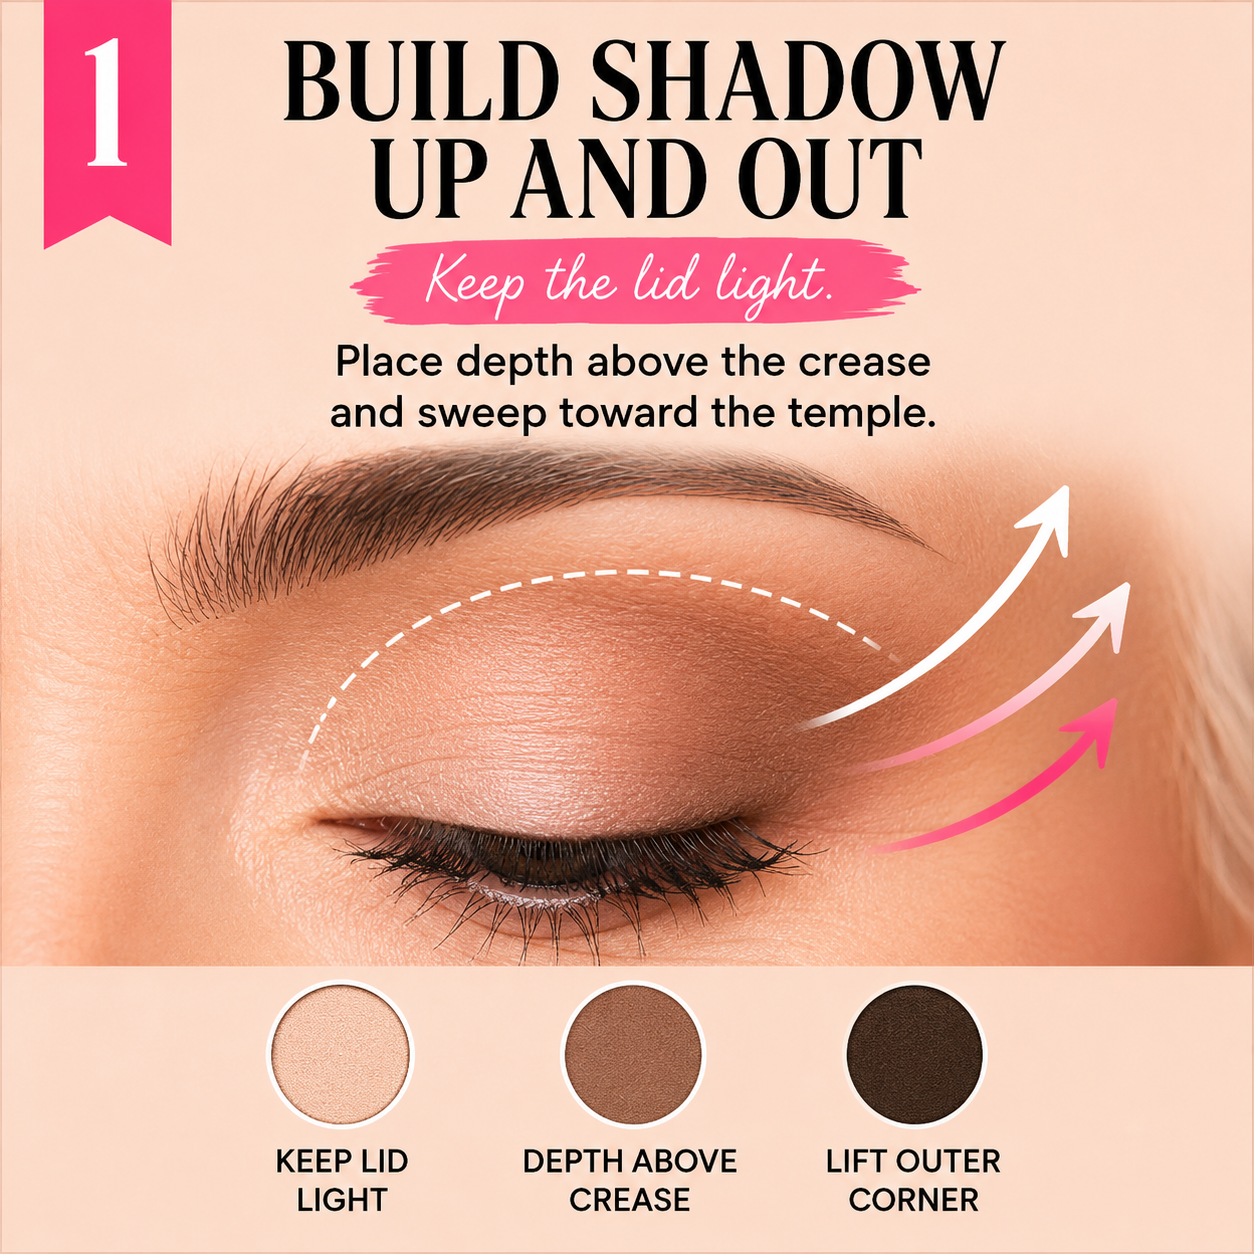
The eyes carry more of the lift than anything else, and they’re also where most of us got taught backward. As we get older the brow drifts down and the upper lid loses some of its open space, which dermatologists file under the unglamorous heading of brow ptosis and dermatochalasis (a fancy way of saying the lid hoods a little). The makeup answer is not more shadow piled on the lid. It’s keeping the part of the lid that actually moves pale and matte, then building all the depth above the crease and out toward the temple, so the eye looks like it’s opening rather than closing.
The technique the artists agree on goes like this. With your eye open, looking straight into the mirror, you take a medium matte shade on a fluffy brush and set it just above where your crease folds, concentrating it at the outer corner and sweeping up toward the tail of your brow. Angie of HotandFlashy, whose mature-skin tutorials are a touchstone for this, says it makes “the skin that folds forward appear to recede,” which is exactly the light-and-shadow trick from up top, done in miniature. Keep the moving lid light. A touch of soft shimmer or a matte ivory right on the center of the lid catches light and pushes it forward, while the depth up and out does the lifting. If you take anything from the eye section, take the direction: everything angles up toward the temple, never down and out into a droopy wing. One commenter’s advice for hooded eyes lands the same way: “don’t be afraid of your eyeshadow going up what feels like ‘too high’… so you still have a lot of color showing with your eyes open.”
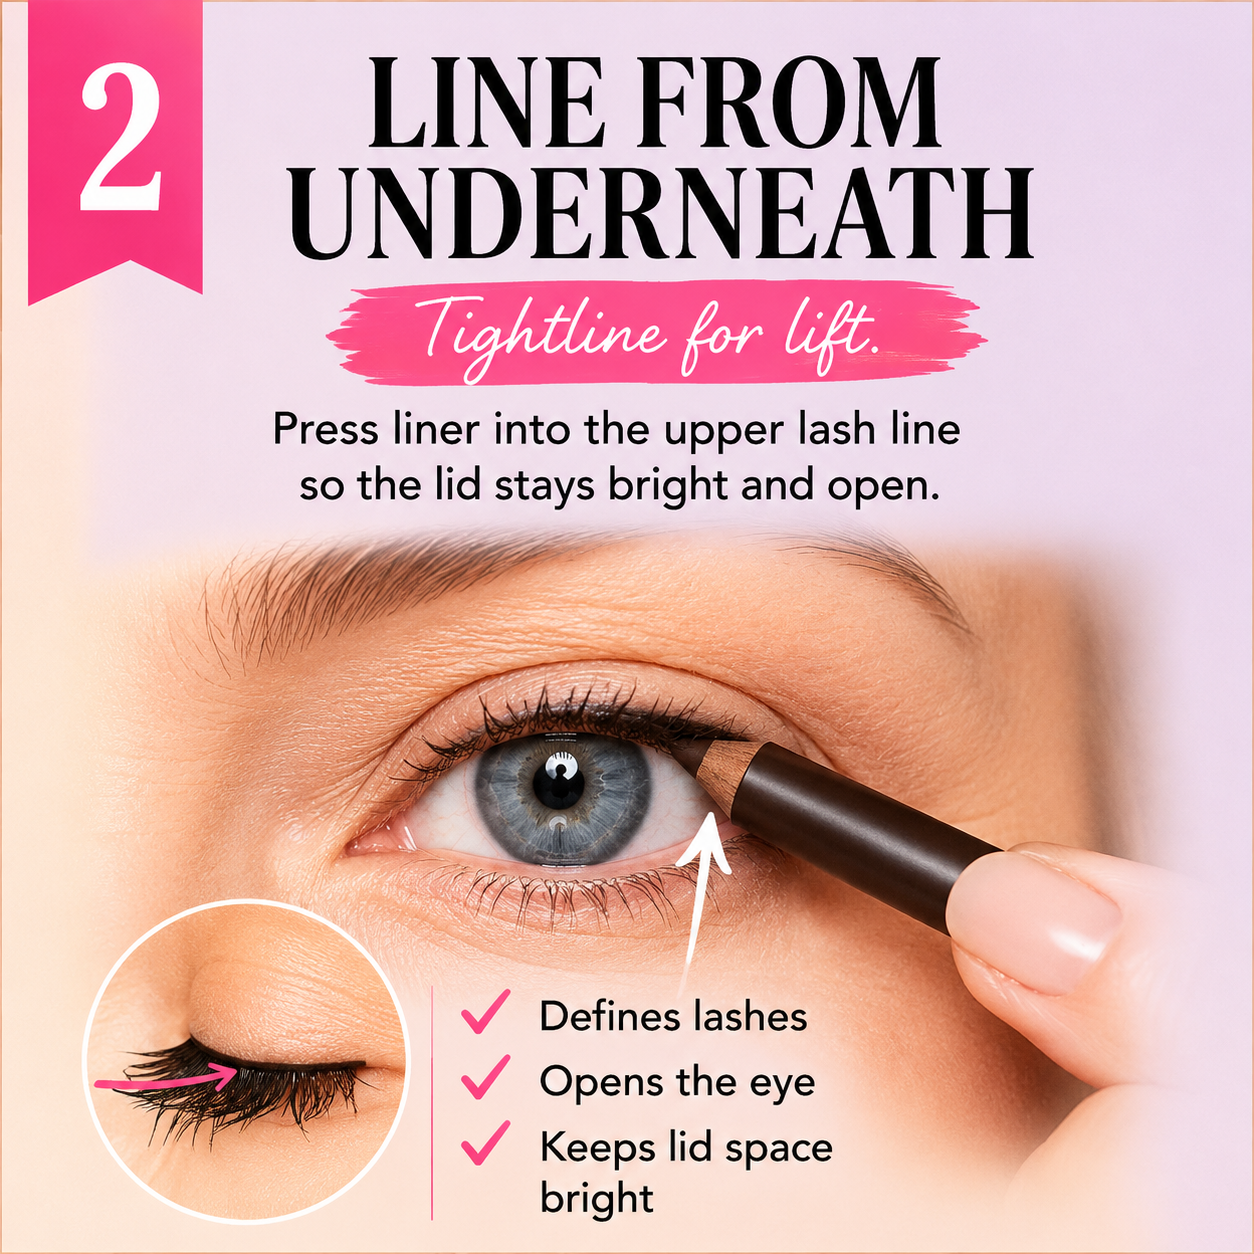
Then the part nobody wants to hear, and it’s the biggest one. Line from underneath, not on top. Dominique Sachse is adamant about it, and so is every hooded-eye specialist I watched. Liner on top of the lid, dragged across, eats up that precious open space; as Sachse puts it, “coming from top down darkens the eye, makes it seem heavy, and also a little bit downturned.” Instead you tightline, pressing a soft pencil or a dark shadow into the base of the upper lashes from below, so the lash line looks dense without stealing any lid. The eye reads as rimmed and awake, and the lid stays bright. A deep brown is softer than black on most mature eyes and reads less like a hard line. For a lot of people it becomes a daily habit; “I at least make sure to tight line my upper lashes before leaving the house,” one commenter said.
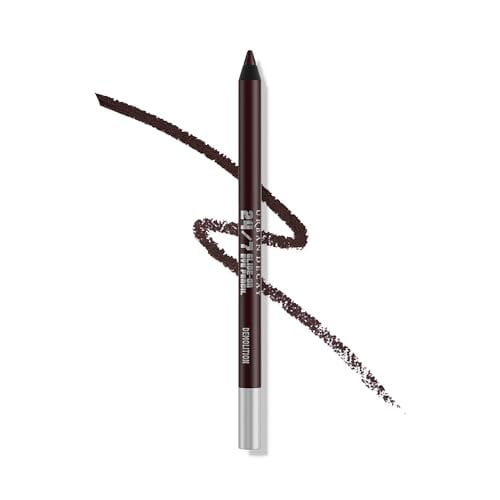
Urban Decay 24/7 Glide-On Eye Pencil (Demolition)
A soft, waterproof pencil built for tightlining. It is creamy enough to press into the upper lash line without dragging, and Demolition is a deep brown that rims the eye more softly than black, which flatters most mature eyes. It is Leaping Bunny certified cruelty-free. One reviewer is honest about the limits: “It looks good. It lasts long, but not as perfectly as I expected from reviews,” so plan to sharpen the soft formula often.
Two finishing touches do a lot here. Curling the lashes opens the eye on its own, no product required, and a single small lash cluster at the very outer corner gives the kind of lift that a wing used to. Risa, a makeup artist who has been doing hooded-eye tutorials for a decade, adds exactly one cluster to the outer corner for that reason. A good metal curler is one of the few beauty tools that earns its place for years rather than months.
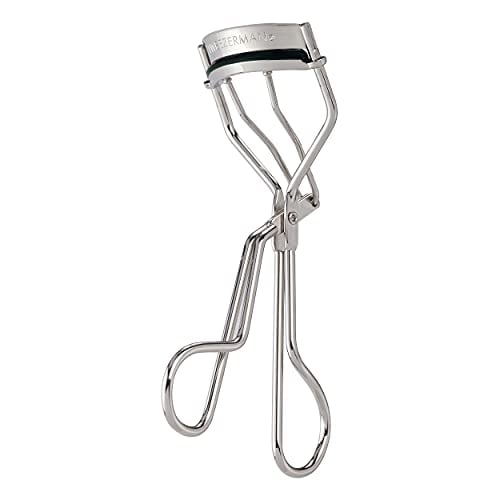
Tweezerman Classic Eyelash Curler
The curler people keep for years. “I still have the one I got 6 almost 7 years ago,” one reviewer said, which is about the highest praise a $20 tool gets. One squeeze at the base of the lashes opens the eye before you have spent a cent on shadow. Just curl before mascara, never after.
From the Hive
The buzz from our Beauty Empties Experts. Sign up to join!
The from-underneath liner is the step our BEEs were most skeptical about and most converted by, because it feels wrong the first few times and then you see your own lid stay open. The ones who stuck with it say the trick is a magnifying mirror and good light, since tightlining blind just smears. A few never warmed up to the lash cluster and went back to plain curled lashes, which lifts plenty on its own.
Put the blush on the bone, not the apple
Cheeks are my thing. My desert island product is definitely blush. I put it on my cheekbones, and lately, since I’ve been talking a lot with makeup artists, I’ll put it higher up on my cheeks and even a little bit onto my temples. Not a lot, but a little. Sometimes I just pat on my Rhode Pocket Blush with my fingers, and sometimes I pat it on straight from the container with a blush brush, but it actually looks best with my fingers. Then sometimes I’ll take a little bit of Pat McGrath powder blush and dab it on my apples too, but that’s just because I’m a little crazy about blush.
The instinct most of us learned was to smile and dab color on the round of the cheek. On mature skin that pulls everything down, because the apple of the cheek sits lower than it used to. As one commenter put it, “people used to say place blush on the apples of your cheeks but almost no one… does this anymore.” Move the same color up onto the cheekbone itself, following the bone back toward the top of your ear, and you’ve drawn the eye up to the highest point of the face.
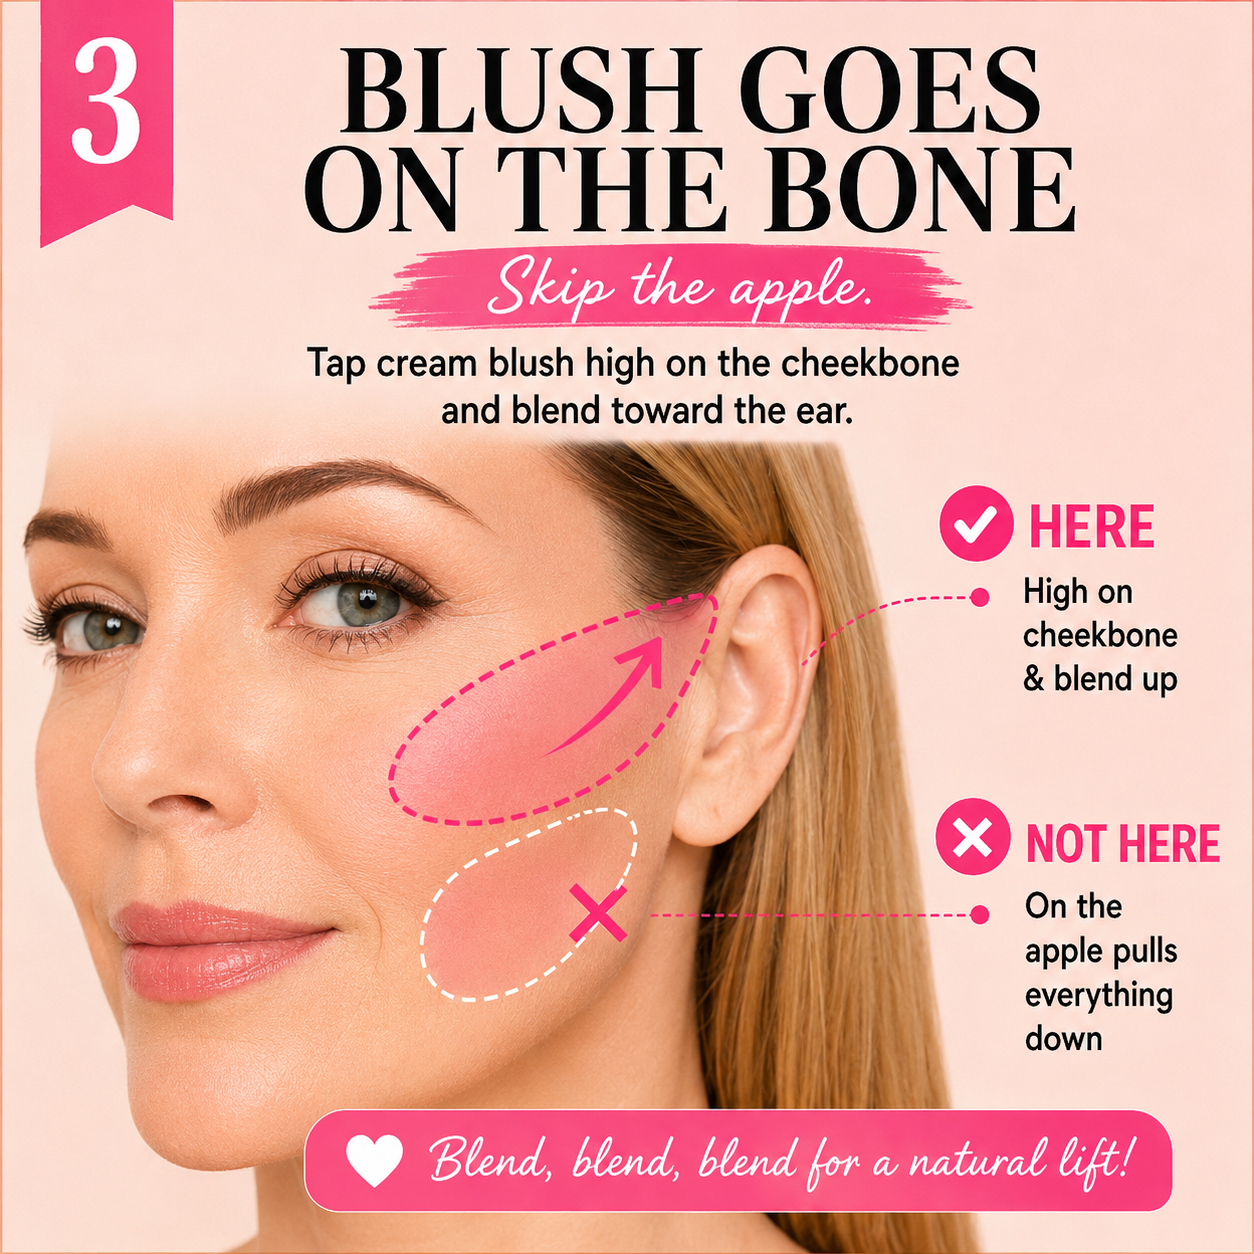
Wayne Goss, who has been teaching makeup online longer than almost anyone, boils it down to two steps: find the cheekbone and follow its natural curve, then make the edges disappear. The disappearing part is where people go wrong. You don’t rub or swipe, you tap the edges with a dense brush or a clean finger so the color looks like it’s coming from under the skin, “just like you ran up a flight of stairs and got that natural flush,” as Goss describes it. Start with less than you think and build, because cream is very hard to take back once it’s on. And cream really does beat powder here: it melts into skin with any texture instead of sitting on top of it, which is why it photographs and wears so much better after 50. One commenter described the payoff exactly: “I usually get red around the center of my cheeks like a cartoon character. I look much better if my blush is around my cheekbones moving upwards.”
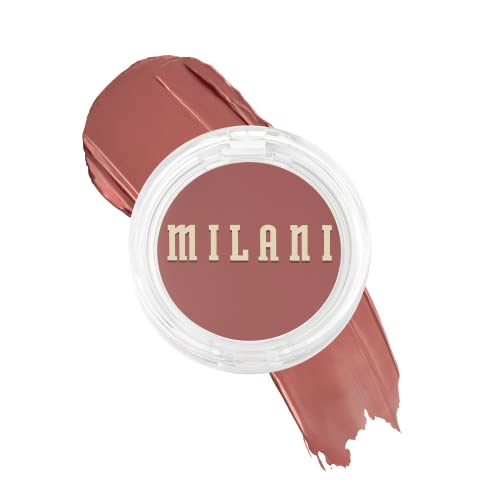
Milani Cheek Kiss Cream Blush
The drugstore cream that holds up. One reviewer who had tested the field put it this way: “I’ve tried every blush on the market and Milani and Rare Beauty are the only ones that last for more than 20 minutes on my face,” and it is the wallet-friendly one of the two. You tap it up the cheekbone with a finger and it sets to a soft, lit-from-within flush. Go light, it is more pigmented than it looks. The cream I personally won’t travel without is the pricier Rhode Pocket Blush, but this is the ten-dollar way in.
From the Hive
Our BEEs put cream blush in the category of changes that look like a tweak and read like a full night’s sleep. The one regret that comes up is going in too heavy on day one, so the advice they pass around is to apply it before foundation has fully set, when a stray edge still blends out with a fingertip. Powder blush didn’t get banished, but most of them moved it to days they want a matte, polished finish rather than a lift.
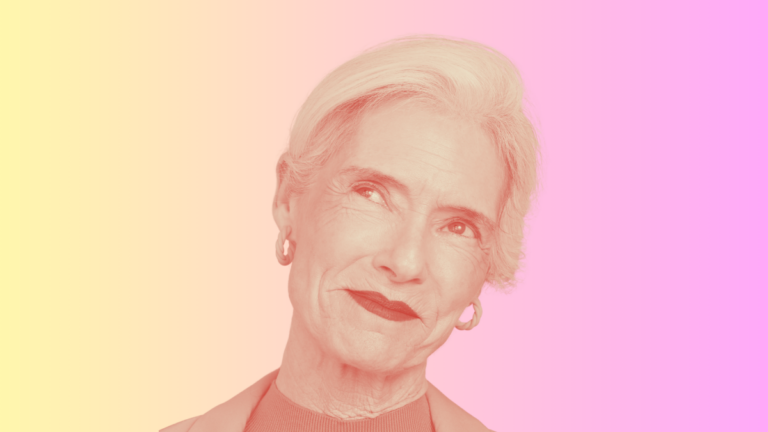
A lighter, slightly higher brow lifts the whole face
For my brows, ever since I started using the Nulastin serum, I have not had to worry about them, and I think it totally changes my face. I love everything about my brows now. I think it makes me look younger and more finished, and I really don’t have to put much on them anymore. I was very close to getting microblading done, and I’m so glad I did not, because they’re looking great now, better than if I’d gotten it done.
Brows do an outsized amount of the lifting because they frame everything under them, and they change with age too: the brow drifts down along with everything else around the eye, and the hairs thin and lighten. The two mistakes that age a brow are going too dark and drawing it in as a solid block. A heavy, flat brow reads as drawn-on and pulls the eye down toward it. What you want instead is a brow with its own texture, built from small strokes, a shade lighter than feels right, with the tail supported just enough to point slightly up and out.
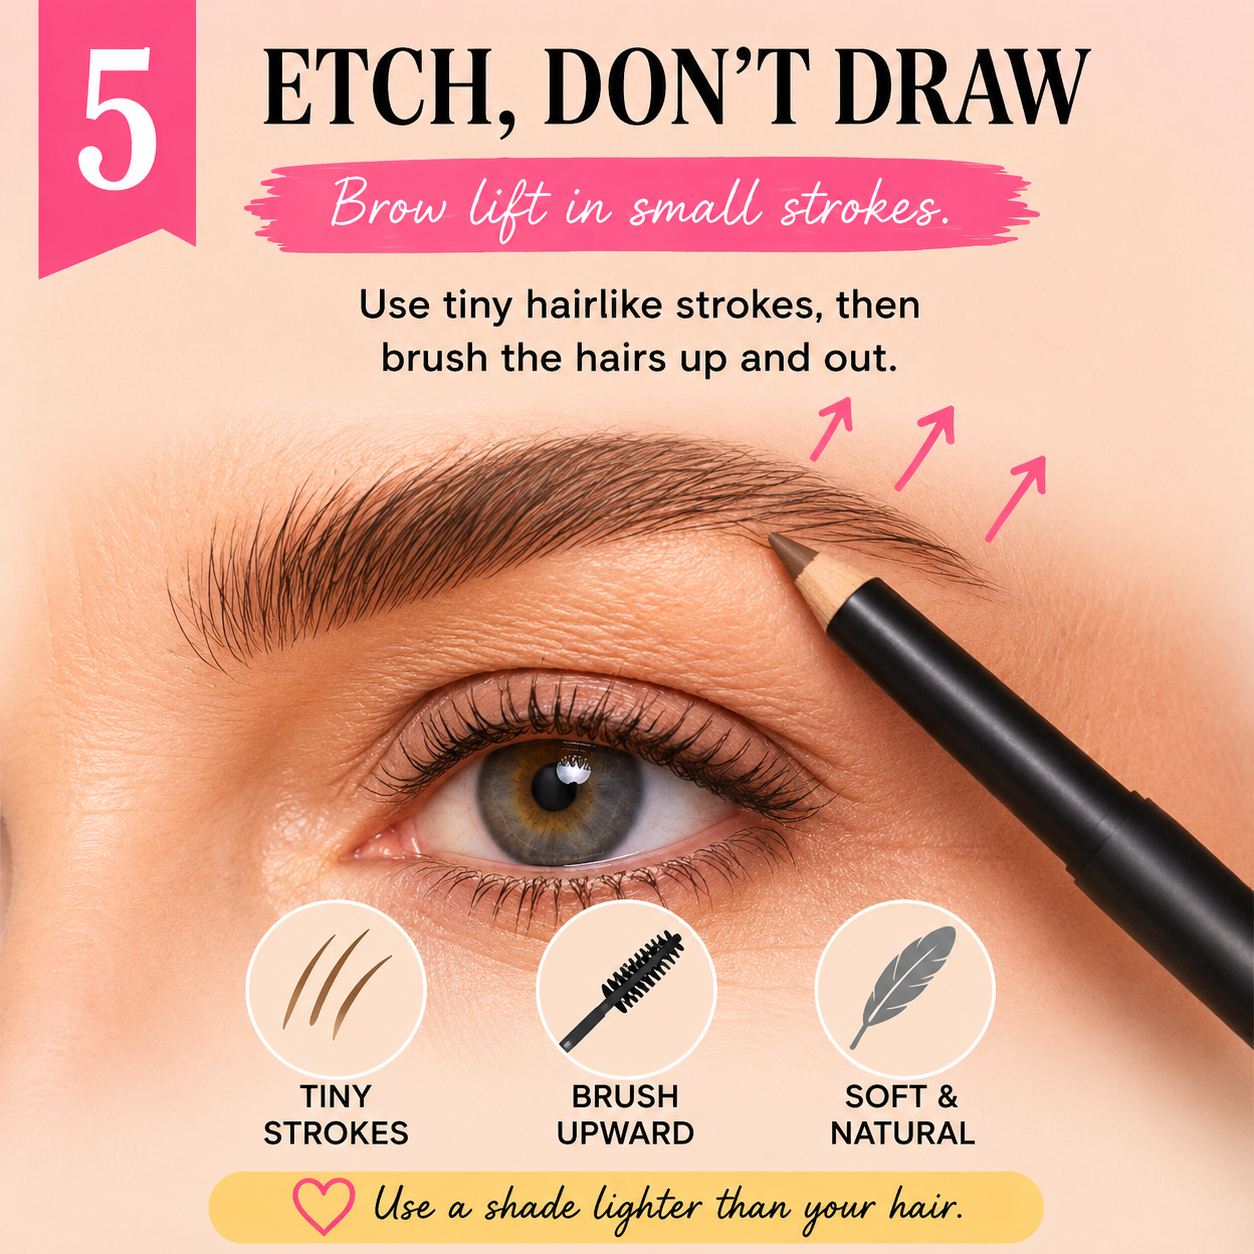
The technique is less filling and more faking hairs. Using short, upward flicks that mimic the direction your own hairs grow, you fill only the sparse spots rather than coloring the whole brow, then brush everything up and set it. Sachse calls it etching a brow rather than drawing one, and her rule is simple: it’s “always better to go lighter than darker.” Done that way, one looks like a brow, the other looks like a sticker. There’s even research showing brow shape and position change how old and how attractive a face reads, and that the ideal shifts with the age of the person looking (Feser and colleagues, Aesthetic Plastic Surgery, 2007), which is a roundabout way of saying there’s no single correct brow, only one that suits your face. Brushing the hairs up at the end is the cheapest lift in this entire article.
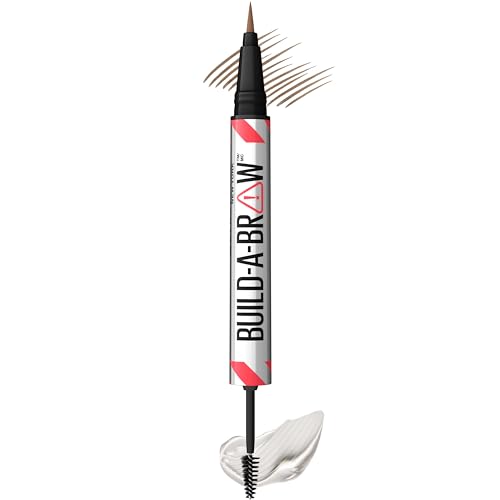
Maybelline Build-A-Brow 2-in-1 Pen & Gel
The brow pen that retired one reviewer’s salon habit. “I’ve gotten my eyebrows done professionally a few times, but I stopped due to the price,” one reviewer wrote. The fine pen tip draws strokes thin enough to pass for real hairs, and the tinted gel on the other end brushes everything up and sets it, for around nine dollars. Two honest notes: the tip can feel scratchy if you press too hard, and Maybelline is not a cruelty-free brand. Go a shade lighter than your hair.
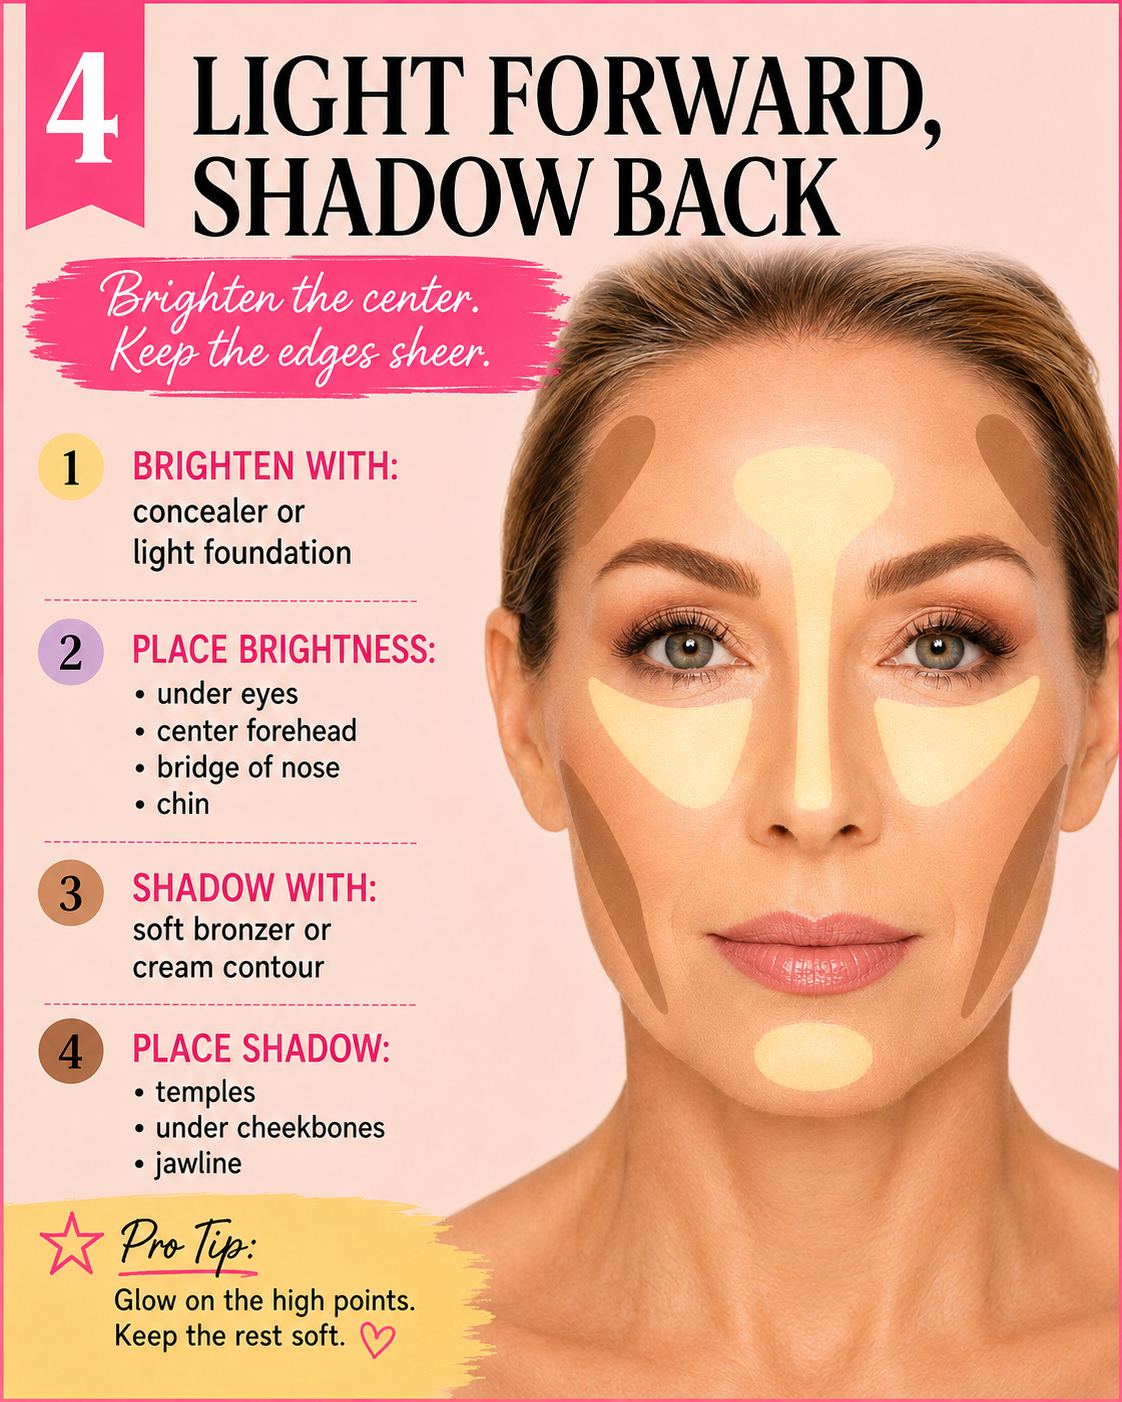
Light in the middle, shadow at the edges
In terms of my complexion, I’m definitely wearing less foundation now. I’ve always been a big fan of the Giorgio Armani Luminous Silk Foundation, but I’m actually testing out some different ones right now, because lately my skin is a little splotchier than it’s been in the past. It could be age, or it could be the tretinoin I’m using. Mostly I just want to cover the red spots. Other than that, I want it very light and very transparent.
I’m not 50 yet, so I still need powder, since my face can get a bit oily in the South Florida heat. I use powder to set my under-eye concealer and in my t-zone. Complexion is where the light-and-shadow rule gets most literal, and where the over-50 instinct to add coverage usually backfires. A heavy matte foundation flattens the face into one even tone, which kills all the contrast we’re trying to protect, and the matte settles into any line it can find. The lift comes from doing less base and more placement. Sachse’s rule, and it’s a good one, is to put your foundation where you actually need it, the center of the face, and whisk the leftovers outward so the edges stay sheer. Match the color to your chest, not your face, so nothing stops at the jaw. One commenter’s fix for under-eye concealer doubles as the rule for the whole center: “focus on putting concealer near the inner corner, and blending it out UPWARDS from there… I’d also suggest angling your blush up more too.”
Then you build the dimension back deliberately. Bring a shade or two lighter than your skin down the center: a little on the forehead, a soft triangle under each eye, a touch on the chin and the bridge of the nose. Those are the high points, and lifting their brightness is the same trick that brightening a tear trough does, since that under-eye hollow deepens into a shadow with age and a little light fills it back in. Then take a soft bronzer or cream contour into the places you skipped, just under the cheekbone and along the jaw, to push them back. Bright areas come forward and shadow recedes, so the face reads as lifted. The mistake to avoid is a high-shine, dewy everything, which sounds youthful but actually catches light on every bump and texture; you want glow on the high points and a soft, matte finish everywhere else.
From the Hive
The fear of powder is the myth our BEEs most wanted busted. The fix that won them over wasn’t skipping powder, it was placing it, a little to cut shine in the center and a dusting under the eyes to stop liner and mascara from sliding south by noon, while the rest of the face stays bare. Most of them also traded a full-coverage foundation for a lighter serum tint and said the swap alone took years off, before they touched a single other step.
Bring the lip back, and lift the corners
For my lips, I’ve always had thinner lips, so for probably the past six or seven years I’ve been lining them slightly outside their natural line. The Rhode Peptide Lip Liner in Lift is great for that, followed by the Armani Lip Power. I also love the Charlotte Tilbury Lip Cheat in Pillow Talk, followed by the lipstick, which is very natural and probably does an even better job.
The lips are a contrast story too. The colored part of the lip rolls inward and thins over time, and the lip lengthens, so the border that used to be crisp goes soft (the perioral aging research, like Iblher and colleagues in 2012, describes it as the lip trading thickness for length). Two things bring it back without anything injected. First, a lip liner in a shade close to your own lip color, used to redraw a clean border and even out the edges, which restores the definition that makes a lip look full. You can cheat the very center of the cupid’s bow and the outer edges out by a hair to fake a little more lip, just don’t chase a whole new mouth. One commenter’s warning is the one to remember: liner “taken too far to the corners of your lips” just “needs to be blended out.”
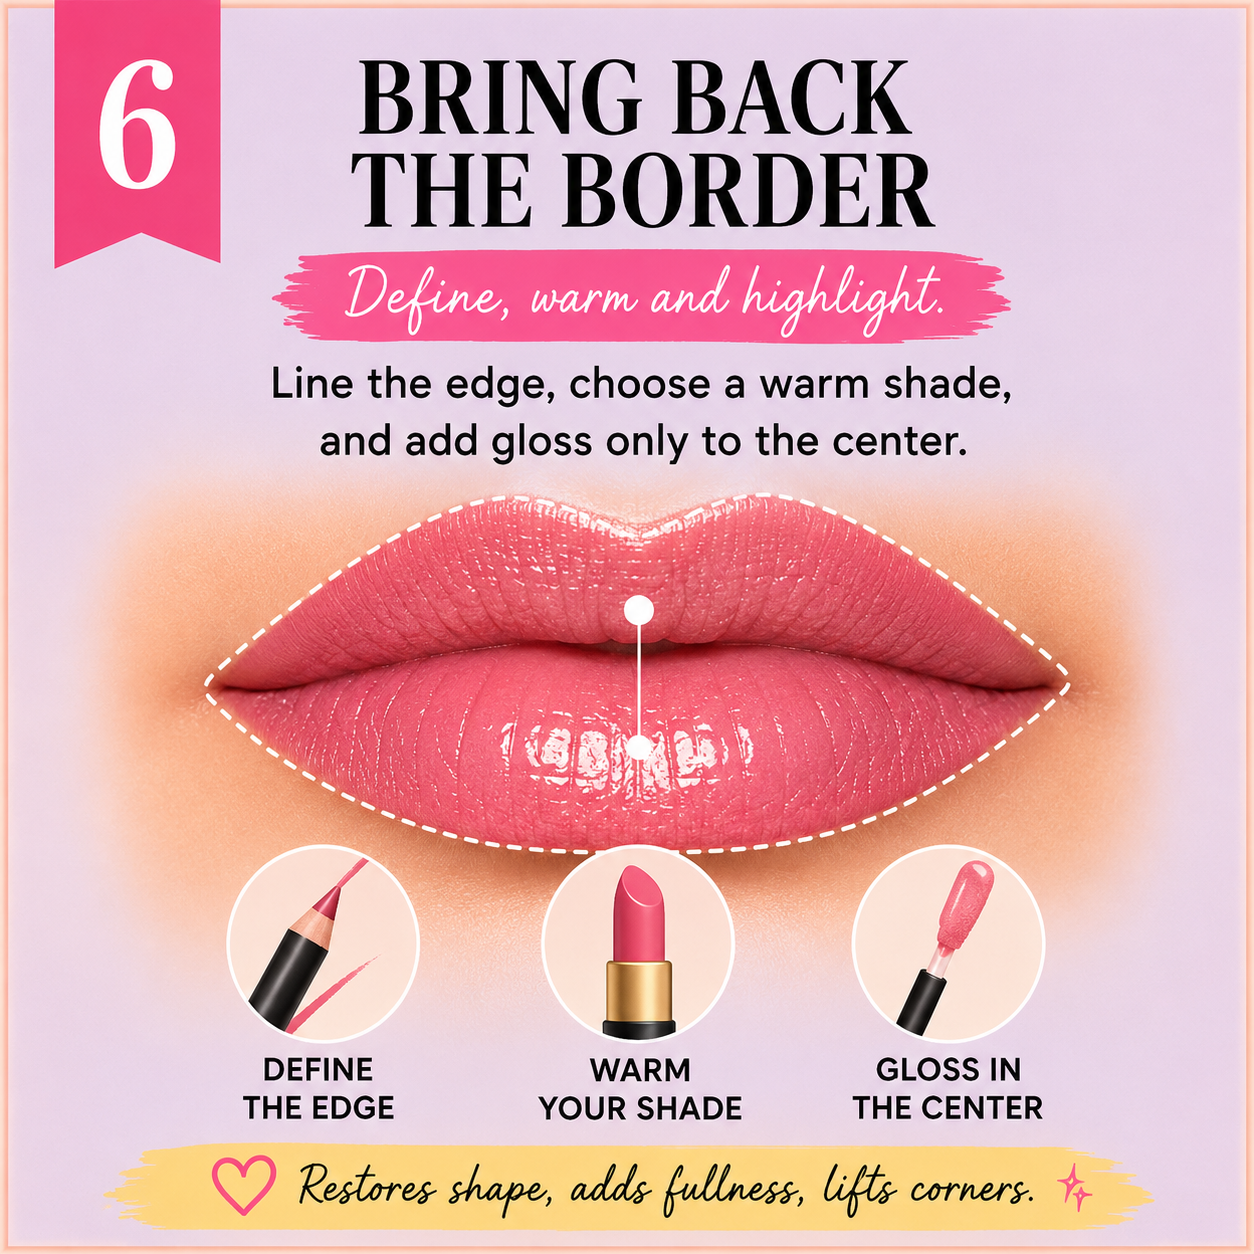
Second, color and finish. Sachse’s take is the one I trust here: go too pale and, as she says, “it looks like you’re not alive,” go too dark and it turns harsh, and the sweet spot is a your-lips-but-warmer shade with enough pink or peach in it to look like circulation. Skip the ultra-matte formulas, which cling to every vertical line, and skip drowning the whole lip in gloss, which travels straight into those lines and bleeds. A dot of gloss in the center of the lip, nowhere else, catches the light at the fullest part and reads as plump without the bleed. A skinny, slightly matte liner holds it all in place.
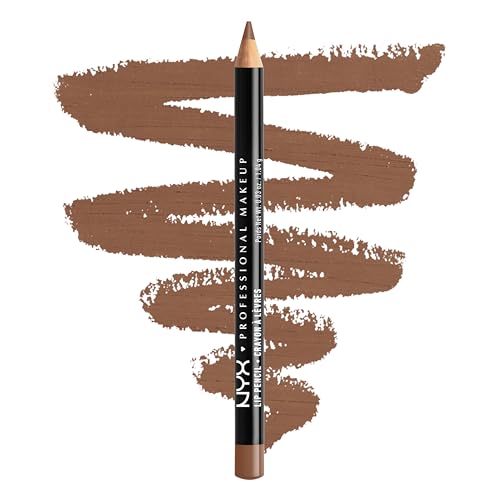
NYX Slim Lip Pencil (Nude Truffle)
The few-dollar liner that wears like a splurge. “I applied this at 9pm and didn’t reapply all night, yet it lasted me until 3 am,” one reviewer wrote. Nude Truffle is the neutral makeup artists reach for under almost any lipstick, skinny and creamy-but-matte so it reads as a slightly better version of your own lip line. It is PETA-certified cruelty-free and vegan. My own pairing is the Rhode Peptide liner in Lift under Armani Lip Power, but this is the budget workhorse.
From the Hive
A skin-tone liner is the sleeper hit our BEEs didn’t expect to love, because it does its job invisibly and they only notice when they skip it and the lipstick starts to travel. The center-dot of gloss got the loudest agreement, with the caveat that a little goes a long way before it migrates. The corner-lift trick splits the room: some swear by tilting the liner up at the outer edge, others find it looks drawn-on and leave the corners alone.
If you only change two things, change the blush placement and line from underneath. Those two carry most of the lift, and you can learn them in a weekend of mornings. Everything else here is a small adjustment to where the light goes. The face you’re working with takes all of this beautifully. It always did.
Frequently asked questions
Does makeup actually lift the face, or does it just look that way in photos?
It’s a visual effect, not a physical one. Nothing here changes the structure underneath. What it changes is where your eye goes when it looks at the face: up toward the brightened, defined high points instead of down. Since how old a face reads is partly about contrast and where the light falls, shifting both really does change how old it looks, in person and on camera. It comes right back off with your cleanser.
Should I switch everything to cream formulas after 50?
Not everything, but creams have a real edge anywhere skin has texture, because they melt in rather than sit on top. Blush, in particular, is worth switching. Powder still has a place for setting shine in the center of the face and keeping liner from migrating. The rule of thumb is cream where you want a lift and a lit finish, powder where you want to cut shine and lock things down.
What’s the one thing to start with if this feels like a lot?
Move your blush up onto the cheekbone. It takes thirty seconds, costs nothing if you already own a blush, and it’s the change with the biggest visible payoff. Once that feels natural, add the from-underneath liner. Those two alone do most of the work.
What Our BEEs Are Buzzing About
Related Articles
- Our Top Face Oils for Aging Skin, and What Each One Is Really For
- The Best Neck Firming Creams, From an $8 Bottle to a $95 Splurge
- How to Give Yourself a Luxurious At-Home Facial
- 9 Beauty Habits of Women Who Always Look Good
Want to become a Beauty Empties Expert?
BEEs get free products to test, exclusive discount codes from our brand partners, and live access to The Hive sessions with dermatologists and beauty editors. Spots are limited and hand-picked.
Beauty Empties researches every pick independently. Products marked cruelty-free are certified by PETA and/or Leaping Bunny.