
This Is the Correct Way Use a Beautyblender
The Beautyblender has completely changed the way we apply makeup. Read on to discover who invented them, what they’re best for, and the correct way to use AND clean them!
If you buy through our links, we may earn a small commission at no cost to you. As an Amazon Associate, we earn from qualifying purchases. Our policy
Did you know that over 65% of women in the U.S. say they wear foundation or concealer on a daily basis? Whether covering undereye circles and acne or simply using it to even out your skin tone, foundation has been a staple in so many of our makeup cases. But while the way we use foundation and concealer hasn’t changed much over the years, the way we apply it has!
From old school wedges and brushes to airbrush machines, we’ve seen a lot of changes when it comes to applicators. But arguably one of the BEST inventions we’ve seen in the past few years has to be the Beaut blender.
So, what is a Beautyblender and what are they good for? Find out the answers to these questions and more below!
What Is a Beautyblender?
The Beautyblender, an egg-shaped sponge made of a latex-free foam, was invented by Hollywood makeup artist Rea Ann Silva in the early 2000’s.
Silva, who is Latina, found herself constantly having to mix makeup shades to achieve the correct palette, which is how the cult makeup sponge was born.
“The biggest fail for makeup applications for many years is that there weren’t enough shades for women of color to actually look natural with makeup on, so you had to learn to become like a mixologist,” said Silva, who DIY’ed an egg-shaped sponge to help apply the colors she mixed. She knew she had a hit when the actors she was working with on all tried stealing her homemade product.
What Are Beautyblenders Good For?
The edgeless Beautyblender, which you are supposed to use when wet, is used to apply and blend everything from foundation and concealer to highlighter and even eye cream and sunscreen. The wet sponge actually absorbs water (not product), which is the secret to why it works so well. It basically mimics your own pores, allowing for a streak-free application that was basically unheard of with older makeup sponges (like the wedge).
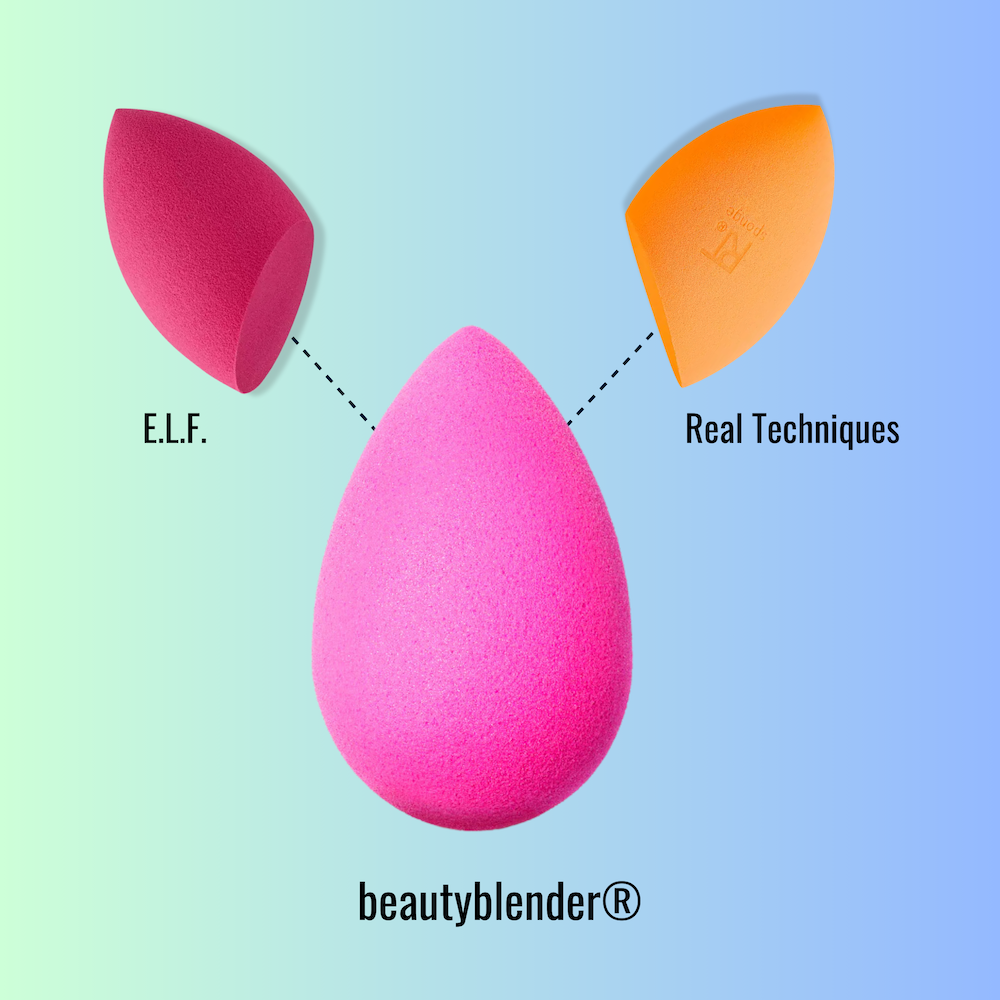
While there are similar sponges out there, the beautyblender has a patented design and material, and most pro makeup artists (and everyday users) say there’s really no comparison. However at $20/sponge, the Beautyblender is expensive. If you’re looking for more wallet-friendly options, other brands have options starting around $5+. Though note that they will not have the patented egg shape that the beautyblender has, and often have a slanted edge, like the photo, below:
Patented Design
While there are similar sponges out there, beautyblender has a patented design and material, which includes the infamous egg shape. (Other brands have a noteably slanted edge.) While there are dupes, most pro makeup artists say there’s really no comparison. However at $20/sponge, the Beautyblender is expensive. If you’re looking for cheaper options, other brands have ones starting at $5+.
Beautyblender Alternatives
- Real Techniques
- Aesthetica
- E.L.F.
- Lamora
- Ecotools
- Zenda Naturals
- Beakey
- Studio Pro
Beauty Buzz
The beauty blender’s iconic pink shade was actually a happy accident. The founder, Rea Ann Silva, wanted to create a color that would really pop in a sea of boring black and white products. But it turns out, the only dye she could afford in the large quantities she needed was pink.
How to Use a Beautyblender
It seems counterintuitive, but one of the reasons the beautyblender works so well (aside from its shape) is that when wet its material causes the sponge to almost double its size. The water gives the sponge a “bouncy” feel, and allows you to effortlessly apply your product while leaving behind a dewy, natural finish. Here’s how you do it:
- Wet your sponge under the tap and squeeze out the excess water
- Apply your product directly to the beautyblender or back of your hand and tap the blender into the product.
- To apply your product, you’ll want to “bounce” the sponge onto the area vs. dragging it. This will ensure that your product is absorbed into your skin and not wiped off.
Watch Marianna Hewitt show us how she uses her beautyblender, below:
How to Clean a Beautyblender
You’ll want to clean your Beautyblender thoroughly after each use. You can use a special Beautyblender solid or liquid cleanser, or a mild dishwashing soap you already have at home. Out of cleanser or dish soap? We’ve used shampoo in a pinch, too.
To clean, wet your Beautyblender and apply a small amount of soap. Next, massage the soap into the Beautyblender until there is a lather. Rinse under water and repeat until the water runs clear. Once cleaned, squeeze any excess water out of the sponge and allow to dry in a ventilated space.
Replace your beautyblender every 3 months on average.
What’s your favorite tool for applying foundation and other makeup? Also, how often do you clean your makeup sponge?
Beautyblender Reviews
Want to become a Beauty Empties Expert?
BEEs get free products to test, exclusive discount codes from our brand partners, and live access to The Hive sessions with dermatologists and beauty editors. Spots are limited and hand-picked.
